Sunday, October 14, 2012

No post in September because...

I got behind in preparation for the California Custom Knife Show.  It was abnormally hot in August and September and shop time was miserable.

The CCKS is in it's third year and this year was my second year holding a table.  A fitting way to mark the passing of my second year as a knife maker. I love shows because even though I am not a "people person" you get to see the look in a person's eye when you have something on your table that truly excites them.  As a new maker it is also a way to catch up with more accomplished maker for a round of constructive criticism. 

I am fortunate when it comes to shows here in So Cal that my wife hangs out with me for one day and my brother the next. I also get to hang out with my good friend Robert Scheppmman (a neighboring knife maker).

Wife and I
Four of the Loveless patterns I had on the table; T-B, Stiff Horn, Chute, Hideout, and Drop Hunter (better pics below)

Sharpwerks side of the table


David Sharp
david@sharpwerks.com

Evolution of a tool (baby steps)

So I developed the idea of the Prybuddy after purchasing a key chain pry-bar and feeling that there was something missing.  Since the first batch I have listened to my customers/friends and tried to improve the capability/useability of the product. Below is a picture of the evolution since:

L-R, The original Prybuddy, Prybuddy Camel Toe, Prybuddy XL, Prybuddy R1, and Prybuddy Edge
The original worked for what I needed it to. Myself and a few friends have been caring them since day one and I so far have had no problem with rust (O1 tool steel).

Even though nobody has complained it was brought to my attention that the corners of the pry tip may gouge your leg when carried on the key ring. This comment brought about the Prybuddy Camel Toe.

The Prybuddy XL came about at the request of a customer; he is a computer tech and carries a multi-tool daily.  The XL was sized to fit in the sheath of most multi-tool as pictured below. I am constantly striving to add more functionality to my tools so I added a notch for scraping a fire starting rod (ferrocerium rod). I have had reports that the XL version also comes in handy as a force multiplier.


Two factors brought about the Prybuddy R1.  The cap lifter worked but not as well as I would like and a friend did not like the orientation of his keys when the cap lifter was used. To facilitate this change I added a bit of width to the Prybuddy so as not to compromise the strength.


The most recent evolution was the edged version. The Prybuddy Edge can be used as a neck knife or can simply disappear in the pocket.  It is only .75" wide so it is only meant to be a convenience edge; opening boxes, cutting paper, etc... It should go with out saying that if the pry bar end is used the sheath should be in place so as not to cut yourself!


Gratuitous pic done by a friend


I am always surprised at how many people ask what the hex hole is for so I added a few pics below.

My personal EDC (Prybuddy XL, County Comm Screw Keys and A&P keyring) plus a single blade pocket knife.
The County Comm Screw Keys work well in conjunction with one of my Prybuddies

Prybuddy R1 with standard .25" driver bit

Prybuddy XL with .25" socket adapter
 If you have any ideas of how to make these tools better/more useful please let me know!

David Sharp
david@sharpwerks.com


Sunday, August 5, 2012

HIDI part 10; Finished!!!

Nicely contoured handles
Utility Hunter

Mini Wilderness

Chute
Traditional Stiff Horn
Utility Stiff Horn

HIDI part 9; handles

The fixture I use for drilling straight holes in handle material being attached to a tapered tang.  It is super high tech; some scrap aluminum and a 1-2-3 block.

I clamp onto the ricasso; the center line is parallel to the fixture and thus  I can drill a straight hole through the handle material.  I use a couple drops of cyanoacrylate and Micarta wedges to support the handle scale.
Fixture clamped in my mill vise.

Drilling my holes; I then flip the knife over and and follow the above steps for the other side.
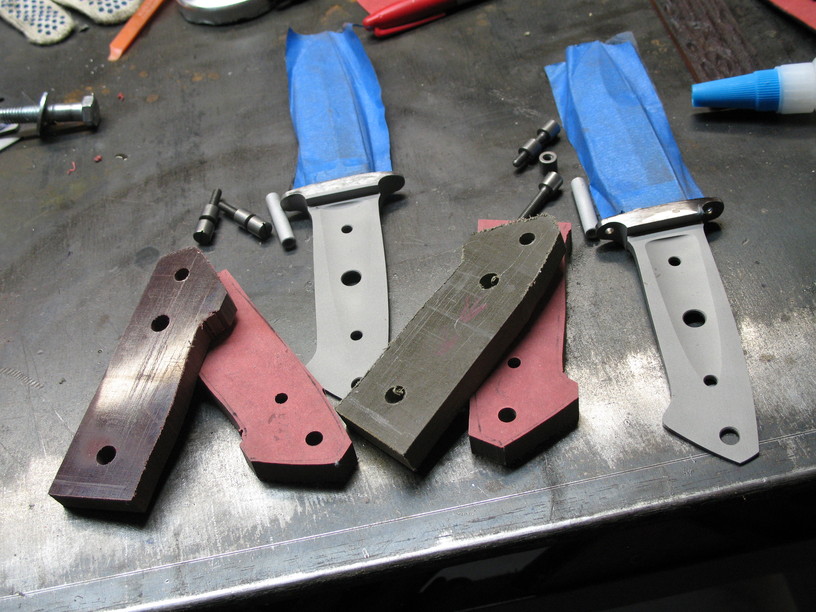
Holes drilled, hardware ready, everything media blasted and ready for glue up.

Glued, screwed and drying.
Rough shaping; grind all bolts level and handle material close to the tang.
Handle contouring starting; grinding handle material down to guard.
Grinding in the heel hollow
Roughly shaped and ready for a whole lot of slack belt work.

My slack belt work starts at 100P and ends at 1200P...

Thursday, July 19, 2012

HIDI part 8; guards and handle material


After polishing it is time to attach the guards (pin and solder). Prior to doing that though I use temp pins and rough shape the guards.

Plenty of blue tape to protect my investment of time in the polished blade. Pre-shaping the guard allows you to more successfully hide the pins. Instead of peening or pressing or both into stainless that is going to be ground away you are peening very close to the finished level. This usually insures an invisible pin.

A close to finish dimension guard.

6 guards ready to attach, all sanded out to 15 micron ;close to 1000 grit. Prior to affixing the guards I clean everything thoroughly with Duplicolor wax remover and alcohol so that I don't end up with an surprises when I solder.

My peening surface, ( I would eventually like to own a nice post anvil for different beating jobs) a 4x4 steel leg supporting 3/8" steel top with an additional 3/4" plate on top of that; works pretty well. I have so far been successful without a pin press so I will probably continue with this method.

Peening and peening...

and done. On to soldering.

Being new and still anxious about some processes I didn't get many action shots of this, also for what ever reason my camera refused to focus on this part. So just a few to move us further along. I use a piece of rectangular brass stock as a graver. I round both top and bottom to give a nice concave fillet.

Set-up in my mini vise and ready for solder. I use the same process detailed in the SRJ sub-hilt DVD.

Post solder clean-up

Flatten all of the handle material.

Blast both liner and handle material, and then...


wipe down with alcohol...

glue...

clamp...

and then clean-up of the pre-glued liner and handle material. This may seem like a lot of work but I do this process in the evenings because the day job won't allow much more and it is still forward progress! As you can see mostly Micarta.